Changing your toothbrush regularly is a must. Because of this, you may accumulate lots of toothbrush waste. Fortunately, there are wonderful things you can do out of your used toothbrushes!
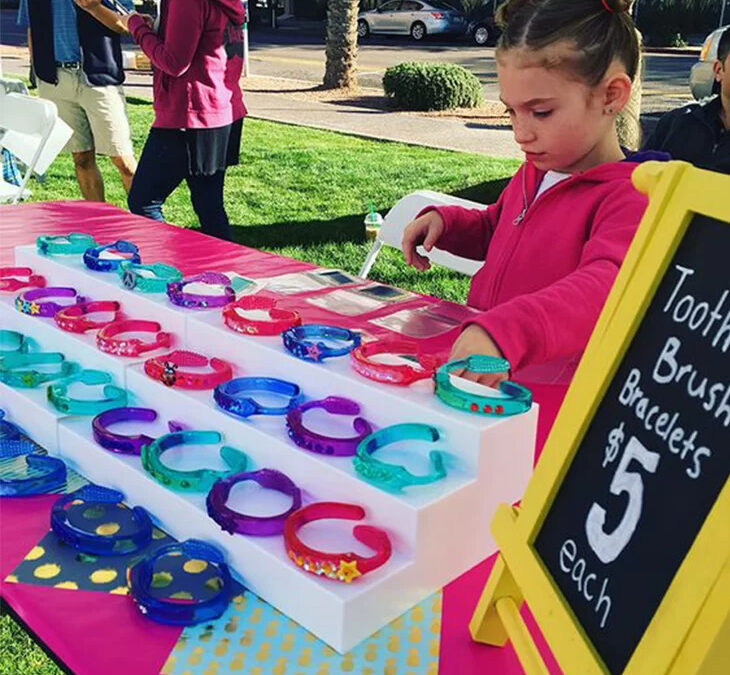
Toothbrush Bracelets
DIY toothbrush bracelets may sound difficult to do. But you can do this charming accessory in five easy steps!
- Prepare hot water, washcloth, pliers, and old plastic toothbrushes. Make sure that the whole toothbrush is made entirely of plastic.
- Pull out all the bristles using the pliers.
- Dip a part of the toothbrush in hot water until it becomes soft and pliable.
- Hold the hot part using a washcloth and slowly bend the toothbrush.
- Repeat steps 3 and 4 until the two ends of the toothbrush meet.
Do note that the type of plastic you use when doing this craft is important. Two types of plastic are commonly used for toothbrushes. These are polypropylene (PP) and styrene-acrylonitrile (SAN) plastics.
You should use polypropylene (PP) plastic. This is usually colored or clear in color, more rigid, and molded as a single unit. PP plastics become bendable when heated while the SAN plastic melts.
Check this video to watch the whole process.
Hooked Toothbrush
Have you experienced misplacing your toothbrush? Or maybe finding them on the floor? The solution is simple. Create this hooked toothbrush and hang it on the curtain rod, shower head, or anywhere (away from the toilet).
To do this, all you need are an old PP plastic toothbrush, hot water, ice-cold water, and washcloth. Do this in four easy steps.
- Prepare all your materials.
- Dip the toothbrush handle in hot water until it becomes pliable.
- Hold the handle’s end using a washcloth and slowly bend it. Create your desired hook shape. You can also use a mandrel to mold the toothbrush handle.
- Submerge the handle in ice-cold water until it hardens.
Paint using your toothbrush.
When it comes to art, possibilities are endless. So here are some painting ideas where you can use your old toothbrush.
- Rainbow Painting
This craft is perfect if you’re looking for fun and easy art. You can enjoy doing this with your kids.
All you need are acrylic paints in the colors of the rainbow, an old toothbrush, and your chosen canvas. Just follow these steps to create your rainbow.
- Squeeze the paints on a container. You can add a small amount of water if the acrylic paint is too thick.
- Dip the toothbrush in red as it is the first color in the rainbow.
- Paint an arc on your canvas.
- Brush back and forth until you get your desired color thickness.
- Proceed to the next color and paint an arc under the first one.
- Repeat this step until you finish all the seven rainbow colors. You can also add other details like clouds.
- Winter Tree
Painting is a great way to enjoy winter indoors. And speaking of winter, you can also create an easy winter art using only a toothbrush, white paint, and a printed tree template. Just follow these quick steps.
- Print a tree template on pale blue paper. This is so the white paint will be visible. Light blue also gives a cold vibe. If you only have a white paper to print on, then you can use blue paint.
- Dip your toothbrush on the paint and use it to put snow on the tree branches. Do this step until you get your desired snow quantity.
You can also check this link for more ideas on what you can do with your tree template.
- Easter Eggs
If you want a fun and engaging activity for Easter Sunday, try this Easter egg painting. The kids will surely enjoy this. Here are the materials you’ll need.
- Hard-boiled eggs (white or brown)
- Small jars or cups
- Liquid watercolor or food coloring with water
- Old toothbrushes
- Paper towel or plate where you lay in the eggs while they dry
Prepare all the materials and give each kid a set of eggs, toothbrushes, and paints. You can put old newspapers or cartons in their activity area to prevent any surface stains.
Just let the kids paint the eggs and create their masterpiece! You can also teach them a painting technique like the splatter technique.
After painting, put the eggs on the paper towel and let them dry. Put the eggs on an Easter egg basket when done.
- Adding Splatters
Splatters make many arts better. You can do this by using any type of paint or watercolors. Just dip the bristles on the paint and flick your finger onto the bristles.
Toothbrush Rugs
If you’re a fan of knitting and crocheting, then this DIY rug project is for you. All you need are old clothes, scissors, and an old toothbrush handle (preferably flat).
Procedure
- Bore a hole on one end of the toothbrush handle. This is where you’ll slip the cloth strips. Then make the other end pointed.
- Cut the clothes into strips, around 1 to 2 inches wide.
- Cut a slit on one end of the cloth strip. Connect the strips by inserting them on the slit on each end.
- Thread the strip on the toothbrush hole.
- Start from the center and make circles of knots. Work your way outward until you reach your desired rug size.
Check this video for a detailed tutorial.
Used Toothbrushes Add Texture to Your Work
Your used and frayed toothbrush can still be useful in many ways. You can also use it to add texture to clay arts. Do this by dabbing the bristles on the clay. Another way is to make a sweeping motion across it. You can also use this technique in oil or acrylic paintings.
Takeaway
You need to replace your toothbrush regularly. Because of this, you may accumulate lots of used toothbrushes. Fortunately, there are ways to reuse these toothbrushes so they won’t end up in the trash bin.
Some of these ways are making bracelets or a toothbrush needle. You can also use your toothbrush to paint. And lastly, use your toothbrush to add textures to your works.
Doing these DIY crafts is enjoyable and saves you money. Most of all, it reduces waste and pollution.
I think other website owners should take this web site as an model, very clean and superb user friendly pattern.
Your blog won’t render correctly on my droid – you might want to try and repair that
I know this if off topic but I’m looking into starting my own blog and was wondering what all is needed to get set up? I’m assuming having a blog like yours would cost a pretty penny? I’m not very web savvy so I’m not 100 certain. Any tips or advice would be greatly appreciated. Appreciate it
Howdy just wanted to give you a brief heads up and let you know a few of the images aren’t loading properly. I’m not sure why but I think its a linking issue. I’ve tried it in two different internet browsers and both show the same outcome.